For every sourdough baker, the “bulk fermentation” stage is both the most crucial and often the most mysterious. It’s the period when your dough truly comes alive, undergoing significant transformation thanks to the wild yeast and bacteria in your starter. But the million-dollar question remains: how to know when bulk fermentation is done? Misjudge this stage, and you risk a dense, gummy loaf or a flat, over-proofed pancake. This comprehensive 2025 guide will equip you with the expert knowledge and practical techniques to confidently assess your dough, ensuring a perfectly proofed, beautifully risen sourdough every time.
Understanding Bulk Fermentation: The Heartbeat of Your Sourdough Loaf
Bulk fermentation, also known as the first rise or primary fermentation, is the period immediately following the mixing of your dough (and often an autolyse and initial folds), where the entire mass of dough is allowed to ferment as one unit. During this time, the microorganisms from your sourdough starter feast on the sugars in the flour, producing carbon dioxide gas and organic acids.
This process is vital because it:
- Develops Flavor: The acids contribute to the characteristic tangy sourdough taste.
- Builds Strength: Gas production and subsequent handling (stretch and folds) develop the gluten network, creating elasticity and extensibility.
- Creates Structure: The trapped gas forms pockets, leading to an open, airy crumb in the final baked loaf.
Unlike traditional yeast breads where you might aim for a precise doubling in size, sourdough bulk fermentation is less about hitting a specific volume target and more about achieving optimal dough development and strength. This development is influenced by a myriad of factors, including dough temperature, starter activity, and flour type, making visual and tactile cues far more reliable than a strict timer.
The Golden Rule: Observing Visual Cues for Bulk Fermentation Readiness
Your dough will communicate its progress through observable changes. Learning to interpret these visual signals is paramount when trying to determine how to know when bulk fermentation is done.
Volume Increase: The Most Obvious Indicator
While not the only indicator, a significant increase in volume is the most straightforward sign of active fermentation.
For most sourdough recipes, you’re looking for an increase of between 20% and 50% in the dough’s original volume. Why such a wide range?
- Recipe Specifics: Some recipes, especially those aiming for a very open, airy crumb, might push for closer to 50% or even 75% rise. Others, particularly those with a long cold proof, might finish bulk fermentation around 20-30% volume increase. Always refer to your specific recipe’s guidance, but be prepared to adjust based on your dough’s feel.
- Dough Temperature & Starter Activity: Warmer temperatures and a super-active starter will achieve volume faster.
- Container Choice: Using a clear, straight-sided container with volume markings (like a Cambro food storage container or a graduated bucket) is incredibly helpful. You can mark the initial dough level with tape or a marker to precisely track its growth. For example, if your dough starts at the 1-liter mark, aim for it to reach between 1.2 and 1.5 liters.
Surface Activity: Bubbles and Billows
As fermentation progresses, the surface of your dough will transform.
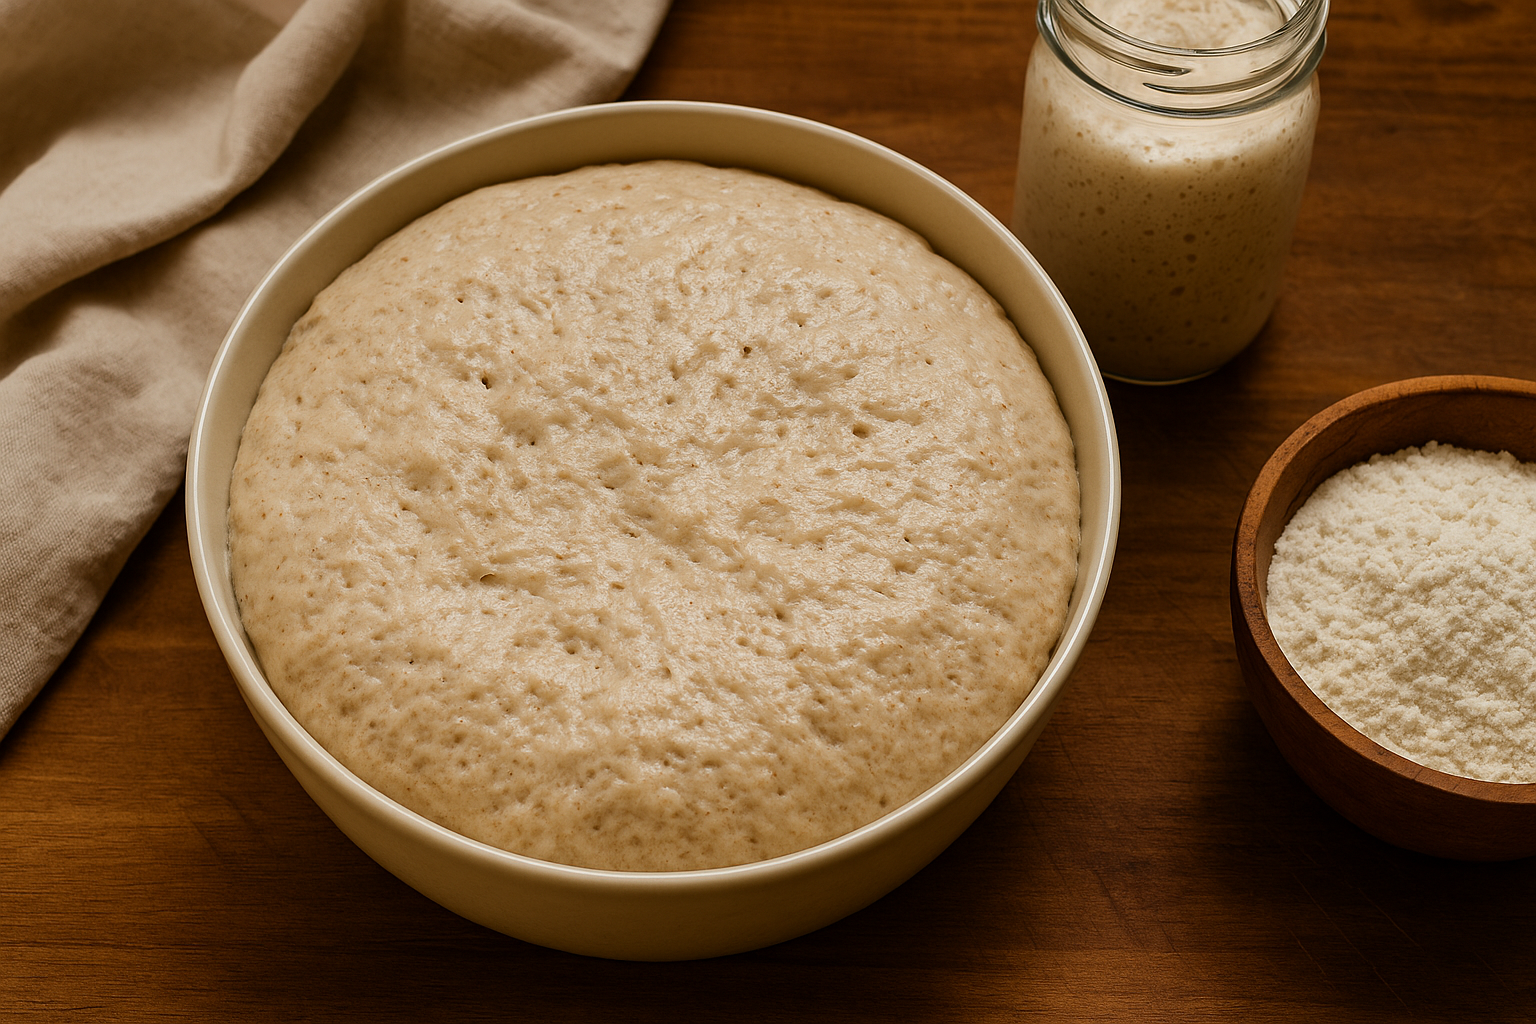
- Visible Bubbles: Look for small, pinprick bubbles across the surface of the dough. These are clear signs of gas production. You might also see larger bubbles forming and popping, especially around the edges of the container.
- Billowy and Domed Appearance: The dough should no longer look dense or flat. Instead, it will appear slightly domed, soft, and “billowy,” as if it’s filled with air. The edges of the dough might also pull away slightly from the sides of the container.
- Smoothness: The surface of the dough will become smoother and less shaggy as the gluten develops and the dough fills with gas.
Feel the Fermentation: Tactile Indicators You Can Trust
Beyond what you see, how to know when bulk fermentation is done often comes down to what you feel. These tactile tests are crucial for pinpointing the perfect moment.
The Jiggle Test: A Gentle Bounce
Gently jiggle or lightly tap the container holding your dough.
- Ready Dough: A properly bulk-fermented dough will exhibit a slight, almost jelly-like jiggle. It should move as a cohesive mass but also feel light and airy.
- Under-Proofed: If the dough feels very dense and doesn’t jiggle much, it likely needs more time.
- Over-Proofed: If it feels overly fragile, collapses easily, or looks like liquid, it’s likely over-proofed.
The Poke Test: Your Dough’s Springiness
The poke test is a classic and highly reliable method for assessing fermentation progress.
- Wet Your Finger: Lightly wet your finger to prevent sticking.
- Gently Poke: Gently press your wet finger into the surface of the dough, about half an inch deep.
- Observe the Indentation:
- Under-proofed: The indentation will spring back immediately and completely, indicating the dough is too tight and hasn’t relaxed enough.
- Perfectly Proofed: The indentation will slowly spring back about halfway, leaving a slight dimple. This is the sweet spot – enough strength to hold shape, enough relaxation to expand further.
- Over-proofed: The indentation will remain fully or mostly indented, or the dough might even collapse slightly, indicating the gluten structure has been stretched too far and is beginning to degrade.
The Unofficial Float Test: A Sourdough Baker’s Secret Weapon (with Caveats)
While primarily used to check starter activity, a variation of the float test can offer an additional clue, though it’s less common for bulk fermentation assessment.
How to Perform the Float Test (for Dough)
Gently snip off a very small piece of dough (about the size of a marble) from the main mass and carefully drop it into a bowl of room-temperature water.
- Floating Dough: If the small piece of dough floats after a few seconds, it indicates that it’s sufficiently aerated and filled with gas, suggesting active and ready fermentation.
- Sinking Dough: If it sinks, it might not have enough gas built up yet, indicating it needs more time.
Caveats: Not Foolproof
It’s important to note that the float test for dough is not as reliable as the visual and poke tests and should be used as a supplementary indicator. Factors like dough hydration and gluten strength can influence whether a small piece floats, even if the main dough isn’t perfectly proofed. It’s best used in conjunction with other observations.
Beyond the Clock: Factors Influencing Bulk Fermentation Time
Relying solely on recipe times for bulk fermentation is a common pitfall. The actual time your dough needs depends heavily on several variables. Understanding these influences is key to accurately answering how to know when bulk fermentation is done.
Dough Temperature: The Ultimate Driver
Temperature is arguably the single most critical factor. Yeast and bacteria are highly sensitive to temperature.
- Optimal Range: For most sourdoughs, a desired dough temperature (DDT) of 75-80°F (24-27°C) is ideal for bulk fermentation, leading to predictable activity.
- Cooler Temps: Below 70°F (21°C), fermentation significantly slows down, potentially taking many more hours than a recipe suggests.
- Warmer Temps: Above 80°F (27°C), fermentation accelerates rapidly, risking over-proofing if not monitored closely. In 2025, many professional bakers continue to emphasize precise temperature control using proofing boxes or simple oven-with-light-on methods.
Starter Activity and Strength
A robust, well-fed, and active sourdough starter will ferment dough much more quickly than a sluggish one. If your starter isn’t doubling reliably within 4-8 hours after feeding, your bulk fermentation will take longer.
Hydration Level and Flour Type
- Hydration: Higher hydration doughs often ferment faster initially because the water makes nutrients more accessible to the microbes. However, they may also require more diligent gluten development to hold that gas.
- Flour Type: Whole grain flours (like whole wheat or rye) contain more nutrients for the yeast, which can sometimes lead to faster fermentation. However, the bran can also interfere with gluten development, requiring careful handling. White bread flour typically offers a strong gluten network, allowing for good gas retention.
Recipe Specifics and Environment
Different recipes target different final crumb structures, influencing the desired level of bulk fermentation. Your kitchen’s ambient temperature and humidity also play a role; a drafty, cold kitchen will slow things down, while a warm, humid one will speed them up.
Featured Snippet Optimization
What is the best temperature for sourdough bulk fermentation?
The optimal temperature for sourdough bulk fermentation typically ranges between 75-80°F (24-27°C). This range encourages robust activity from your sourdough starter’s yeast and bacteria, leading to efficient gas production and flavor development. Consistency in dough temperature is crucial for predictable fermentation times and achieving the desired rise and crumb structure.
How much should sourdough dough rise during bulk fermentation?
Sourdough dough should ideally increase in volume by 20-50% during bulk fermentation. The exact percentage depends on the specific recipe, desired crumb structure, and whether a cold proof will follow. Using a clear, straight-sided container with volume markings helps accurately track this increase and is a key visual cue for readiness.
What does an over-proofed sourdough look like?
An over-proofed sourdough dough will often appear excessively bubbly, feel very loose, fragile, and may even show signs of collapsing in the container. When poked, the indentation will remain fully or mostly present without springing back. When baked, an over-proofed loaf typically spreads out (known as the “pancake effect”) rather than rising upwards, resulting in a dense, gummy, or even crumbly texture.
Pro Tips for Sourdough Bulk Fermentation Success
- Invest in a Proofing Container: Use a clear, straight-sided food-grade container with measurements (like a Cambro) to accurately track your dough’s volume increase. This is the single best tool for visual assessment.
- Monitor Dough Temperature: A digital instant-read thermometer is your best friend. Always check your dough’s temperature at the start and periodically throughout bulk fermentation. Adjust your proofing environment (e.g., using an oven with the light on, a dedicated proofing box, or simply finding a warmer spot) to maintain the ideal range.
- Keep a Baking Journal: Record your starter feeding times, dough temperature, bulk fermentation start/end times, and observations (visual, tactile). This data is invaluable for learning how to know when bulk fermentation is done in your specific kitchen environment with your specific starter.
- Read Your Dough, Not Just the Clock: While recipes provide time guidelines, understand that these are estimates. Your dough’s readiness is dictated by its behavior and feel, not rigid adherence to a timer.
- Gentle Handling is Key: During stretch and folds, handle your dough gently to avoid degassing it too much. Preserve those precious gas bubbles that are building the structure.
- The “Windowpane Test” for Gluten Development: Before bulk fermentation, ensure you have adequately developed gluten. If a small piece of dough can be stretched thin enough to see light through it without tearing, your gluten is strong enough to hold the gas produced during fermentation.
Frequently Asked Questions (FAQ)
Q1: Can I cold proof my sourdough during bulk fermentation?
Yes, you can. This is often referred to as “retarding” the bulk fermentation. While initial bulk fermentation usually happens at room temperature, some bakers choose to do a portion of their bulk in the refrigerator to slow down the process, enhance flavor development, and offer scheduling flexibility. However, if doing a full cold bulk, expect it to take significantly longer (12-24+ hours), and ensure the dough has already built some initial strength and rise before chilling.
Q2: What happens if I under-proof my sourdough?
If you under-proof your sourdough during bulk fermentation, it means the yeast hasn’t produced enough carbon dioxide, and the gluten structure hasn’t fully relaxed. The resulting loaf will typically have a dense, tight, and sometimes gummy crumb. It might also burst aggressively in the oven due to trapped gas escaping suddenly, leading to a single large “tunnel” or an uneven structure rather than an open, airy crumb.
Q3: What happens if I over-proof my sourdough?
Over-proofing occurs when the dough ferments for too long, consuming most of the available sugars and causing the gluten network to become overstretched and weak. An over-proofed dough will often collapse when handled or baked, leading to a flat, dense loaf with a very tight crumb, or in severe cases, a completely collapsed, gummy interior. The flavor might also be excessively sour due to prolonged acid production.
Your Sourdough Journey: What’s Next?
Understanding how to know when bulk fermentation is done is truly a turning point in your sourdough baking journey. It transforms the process from guesswork into an informed art, allowing you to consistently produce beautiful, delicious loaves. Remember, practice makes perfect, and every bake offers a new opportunity to learn from your dough.
What’s the most surprising thing you’ve learned about bulk fermentation, or what’s your go-to method for checking your dough’s readiness? Share your insights and questions in the comments below – let’s learn and grow together!


